Copyright © 2008-2024. All rights reserved.
Careforhair.co.uk is a part of
Eighty Done AB
Aug
18
2017

7 of The Easiest Braided Hairstyles You Can Try At Home (Step-by-Step Guide)
By Laura
If you’ve ever avoided braided hairstyles assuming them to be too fiddly and complicated, we’re about to bust that myth and convince you that this doesn’t have to be the case. Don’t waste another minute on tricky and hard to follow tutorials promising to be simple and quick because easy and gorgeous braids do exist!
Take a browse through our collection of beautiful braided styles below, all in the happy knowledge that we’ve gathered together only the most easy-to-follow tutorials so you can get braiding at home today!
1. How to Create the World’s Most Simple Crown Braid in 5 minutes or less!
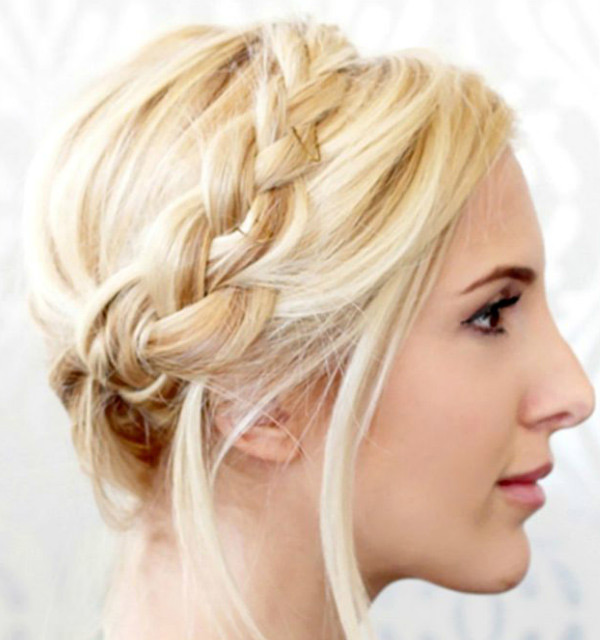
Image Courtesy: Byrdie.com
This gorgeous crown braid is perfect for a wedding or fancy event. While the style is glamorous and appears to have been carefully crafted over a few hours at the hairdressers, would you believe it takes no more than five minutes to pull together yourself? It’s perfect for beginners to try out at home. Check out the step-by-step instructions below and there’s also a video you can watch where Lindsay from Maven Beverly Hills breaks down each step.
- 1/Start by parting your hair right down the middle into two even sections.
- 2/Next you just need to braid each section into a simple braid, fixing the ends with clear elastic bands to keep them in place. Top tip: You can ‘fatten’ up the braids and add a little volume by lightly pulling the loops of the braids outwards to loosen.
- 3/Pull both of the braids up to meet at the top of our head, forming the ‘crown’ shape. Secure both braids at the top and the ends with bobby pins.
- 4/Personally, we love this look to be a little ‘boho’ so feel free to pull loose a couple of strands of hair to fall around your face.
2. Create Your Own Gorgeous Waterfall Braid – It’s easier than you might think!
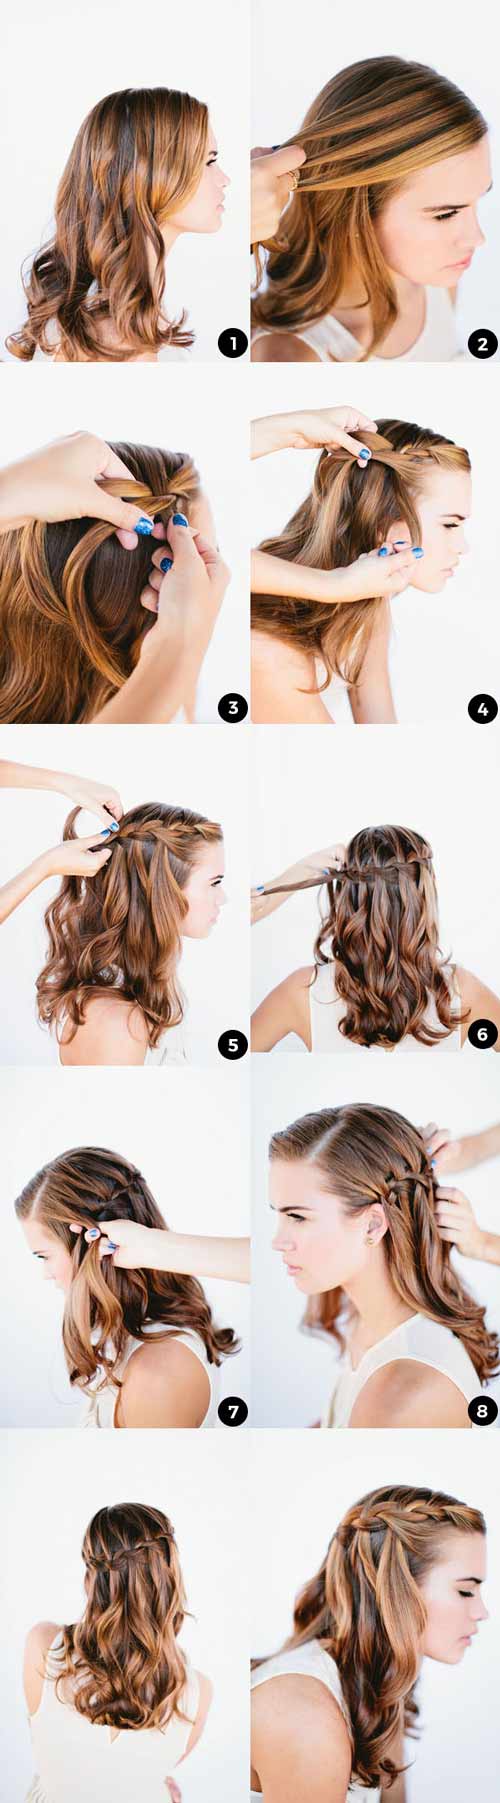
Image Courtesy: the11best.com
The Waterfall braid is the most sought-after braided style right now and it’s a great braided style for long hair. While it might look tricky and complicated, it’s much less effort than you might think. You wouldn’t know it, but this cute style actually isn’t a braid at all – it’s a simple twist. Take a look at the full breakdown of instructional steps below, and you can also watch Stephanie Brinkerhoff’s video tutorial.
- 1/Starting on the left-hand side of your head, separate a two-inch section of hair just above your ear and split it in half.
- 2/Now we start twisting! Take the piece closest to your face and cross it over on top of the other piece. Then, drop that other piece, and pick up a new piece of hair in its place. (It might sound tricky but it’s much more simple than it sounds – make sure you check out the video footage)
- 3/Now we create the ‘waterfall’ effect. Just as we did in the previous step, cross the new piece on the bottom over that top piece. The key here is to drop the top piece and pick a new section each time, this is the start to your waterfall twist.
- 4/Keep repeating these same steps, continuing your waterfall twist around the back of your head all the way until you reach the middle of the back of your head. Secure the end of the twist in place with bobby pins.
- 5/Repeat steps one through four on the right side of your head to create the same design.
- 6/Once you reach the back of your head on the right, combine the ends of both twists with a small elastic.
- 7/Keep the style in place all day (or for a night full of dancing!) with a mist of hairspray.
3. The Triple Braid
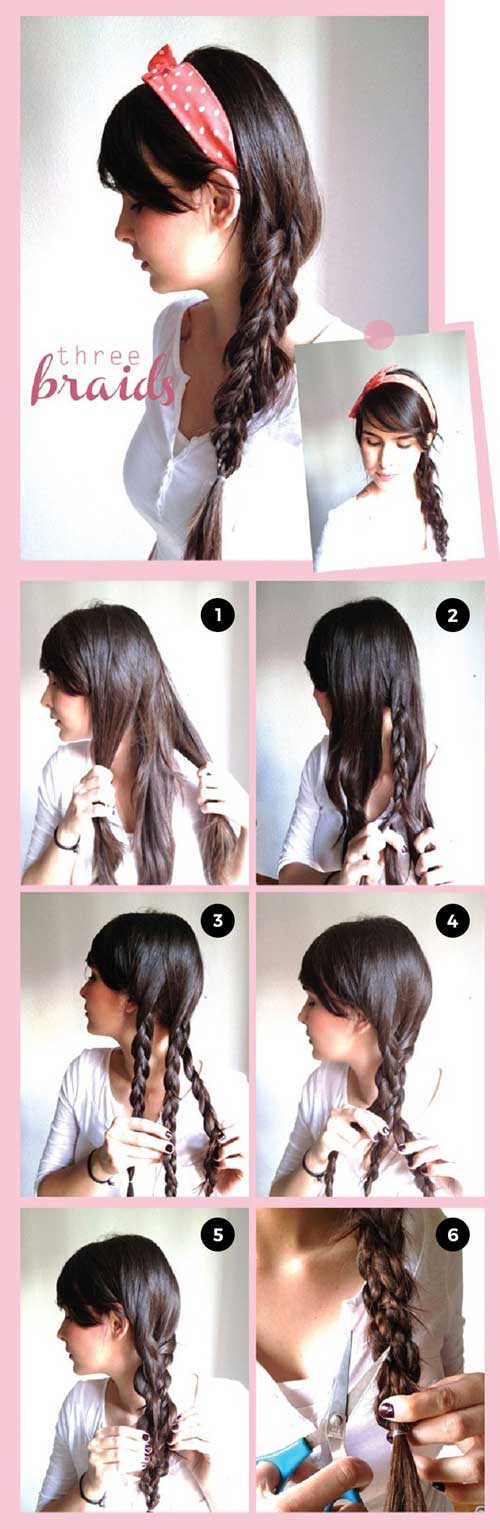
Image Courtesy: topinspired.com
This triple braid works best with longer hair but if you have thinner or fine hair this is also a great style for you as it adds a lot of volume and texture for a fuller looking braid. It can look super tricky so you’ll be sure to amaze your friends and have everyone guessing how you made it at home on your own!
- 1/Start by dividing your hair into three even sections and create a simple braid of each section. Secure each braid with a clear elastic band.
- 2/Would you believe this is only a 2-step tutorial? All we need to do now is braid the three braids together into one large side braid.
- 3/The bonus step here is to pull and loosen up the braid a little once we’re done as this completes the look of thicker hair and braid.
4. Step by Step Guide to Creating the Braided Bun For Beginners

Image Courtesy: CuteDIYprojects.com
Another great style for beginners to try out, this braided bun is very elegant and would be a great choice for a special occasion such as a ball, prom or wedding, and it’s still super simple to pull together. The style looks very professional and you won’t believe how simple it is to put together yourself – so much so that it might be the perfect braided updo if you are running late for your event. Check out the simple step-by-step guide to creating the look yourself at home:
- 1/Start by dividing the entirety of your hair into three sections. Note: The middle section should be a bit bigger than the two on either side.
- 2/Create three simple braids of each of the three sections, secure with a clear elastic band.
- 3/After creating the braids in each section, use the middle braid to twist up into a simple bun in the middle at the back of your head.
- 4/After that, bring the braids fro either side in and around the bun to create the final look!
- 5/Tip: Wrap one braid from the top and around and the other braid from the bottom up and around for the best finishing look.
5. How to create your own Headband Braid (for shorter or medium length hair)
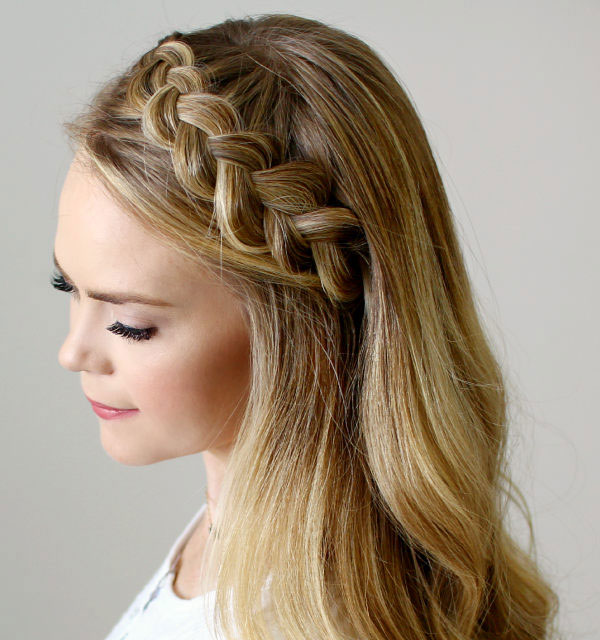
Image Courtesy: missysue.com
The Dutch Headband Braid is a classic style that never goes out of fashion. It’s girly and pretty and looks great for anyone with longer hair. This style can also work for shorter of medium length hair working just through the front sections. It doubles up in the practical sense of keeping hair back off your face all day! See below for the step-by-step guide to follow and you can also watch the full video tutorial here.
- 1/Begin with your hair parted to the right side. Gather a small section of hair about 3 inches wide starting at the part. Separate this section into three equal parts for your braid.
- 2/Begin the braid by crossing the 2 side strands under the middle strand, note to tuck it under not over the middle as in a ‘usual’ braid.
- 3/Now we start to move the braid along the crown of your head, with each fold under you can gather up a small section of hair and add in into the left side strand. Cross this side strand under the middle section.
- 4/Repeat the same on the left side of your hair by picking up and adding in the strand on the right side, crossing it underneath the middle section.
- 5/Continue to work through incorporating a little more hair each time into the strand on each side you cross under the middle.
- 6/Once you reach the point just above your ear you can braid the remaining section in a simple braid without adding in any additional hair. Finish off with a clear elastic band.
- 7/Tuck in the braid underneath a large section of hair towards the back of your head and secure with bobby pins.
- 8/Let the hair from the top of the head fall loosely over the pinned band to disguise it.
- 9/Extra Tip: using a curling iron add some soft and loose curls to the rest of your hair to complete the look!
6. The Twisted Crown Braid – Cute style for medium and shoulder length hair
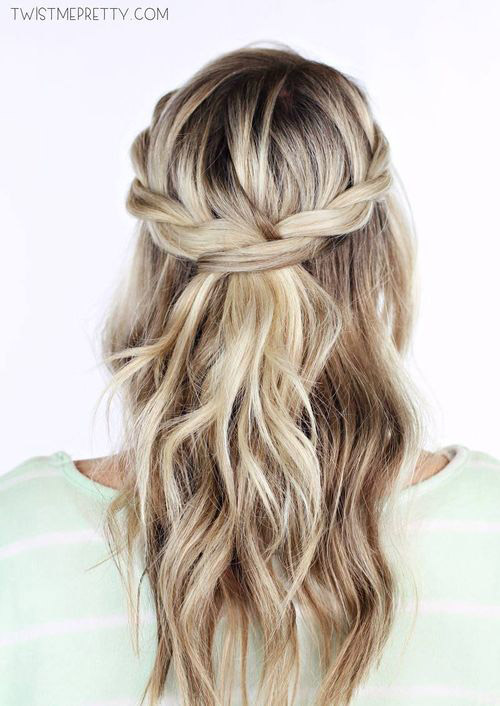
Image Courtesy: twistmepretty.com
This Crown Braid is similar to the Simple Crown Braid we discussed earlier in this article, but with a bit of a twist (literally!).
Tip: For this style, make sure you have a good few bobby pins on hand ‘cos your gunna need them! This cute style can also work with both medium and shoulder length hair so check out the steps to try it at home today:
- 1/ Start with separating a small ‘triangle’ section of your hair in from one side of your head, near your part.
- 2/ Split this section into two sections to begin the braid (which is really just a twist, not a braid at all – how simple is that!).
- 3/ Start to twist the two sections over one another, adding a new section of hair at small intervals along the way.
- Tip: Take a look at the quick video tutorial here which gives a really clear demonstration: video tutorial
- 4/ Once you reach the back of your head (in the middle) this is one side of your ‘Crown’ complete so you can tie it off here with a clear elastic band.
- Now we repeat steps 1 – 4 on the other side of your head, working back again until both sides meet in middle at the back of your head. Make sure you tie off both sections.
- 5/ Loop one of the twists through the other by threading through one of the gaps in the other.
- 6/ Pull the other twist through the gap or hole.
- 7/ Finish off with a nice mist of hairspray to keep it in place all day.
Check out the full tutorial here.
7. The Pull Through Braid – Super-easy to do

Image Courtesy: Confessions of a Hairstylist
This stunning braid is another easy style that actually isn’t a braid at all! It’s also a great choice to wear to the gym to school or for a more active day. It looks tidy and fashionable while remaining practical enough to keep your hair back off your face all day! Try this simply style for medium and longer length hair.
- 1/Start by tying your hair into a high ponytail.
- 2/Divide your ponytail into two separate sections – secure these sections together with an elastic about 2 inches down from the first elastic, loop the rest of your hair up and ‘through’ the middle.
- 3/Simply continue this method through the length of your hair.
- 4/Check out the whole video tutorial here.
Want more? Check out our dedicated braided hairstyles gallery with 50+ braided hairstyles for you to try today.
Related Articles
 15 of the best short hairstyles for women over 60
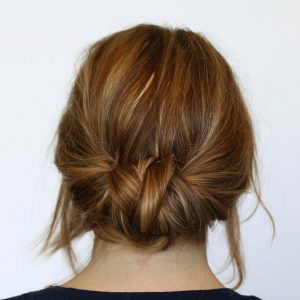 7 ideas for cute updos that you can do yourself (including step-by-step guides)
 Fine hair, don't care! 9 simple tricks to add volume to thin hair
 5 Hairstyles for Short Fine Hair (plus 40 more!)
 2014 Prom Hairstyles For Every Hair Length
 Coif Trend: Spring 2014 Hairstyles
Filter