Copyright © 2008-2024. All rights reserved.
Careforhair.co.uk is a part of
Eighty Done AB
Sep
13
2017

7 ideas for cute updos that you can do yourself (including step-by-step guides)
By Laura
If you’re looking for a gorgeous and fashionable updo for a special occasion or if you’re after something fresh and new to wear to work or school, we’ve pulled together a fantastic collection of beautiful and stylish updos that you can try at home today.
Most of us opt to wear our hair down or in a simple ponytail every day and don’t often try new and pretty hairstyles, but why not browse our inspirational collection of styles and tutorials so you can find something to try out on yourself (or a friend) straight away.
We’ve made it simple for you by pulling together the most easy to follow guides and images so you can get experimenting right now without the need to spend hours watching long and complicated tutorials.
Check out our top updo styles for Work and School, Braided up-dos and our new favourite, the half up-do. We’ve got you sorted for every occasion.
Cute Updos for You to Wear to Work
1. The Low Rolled Updo
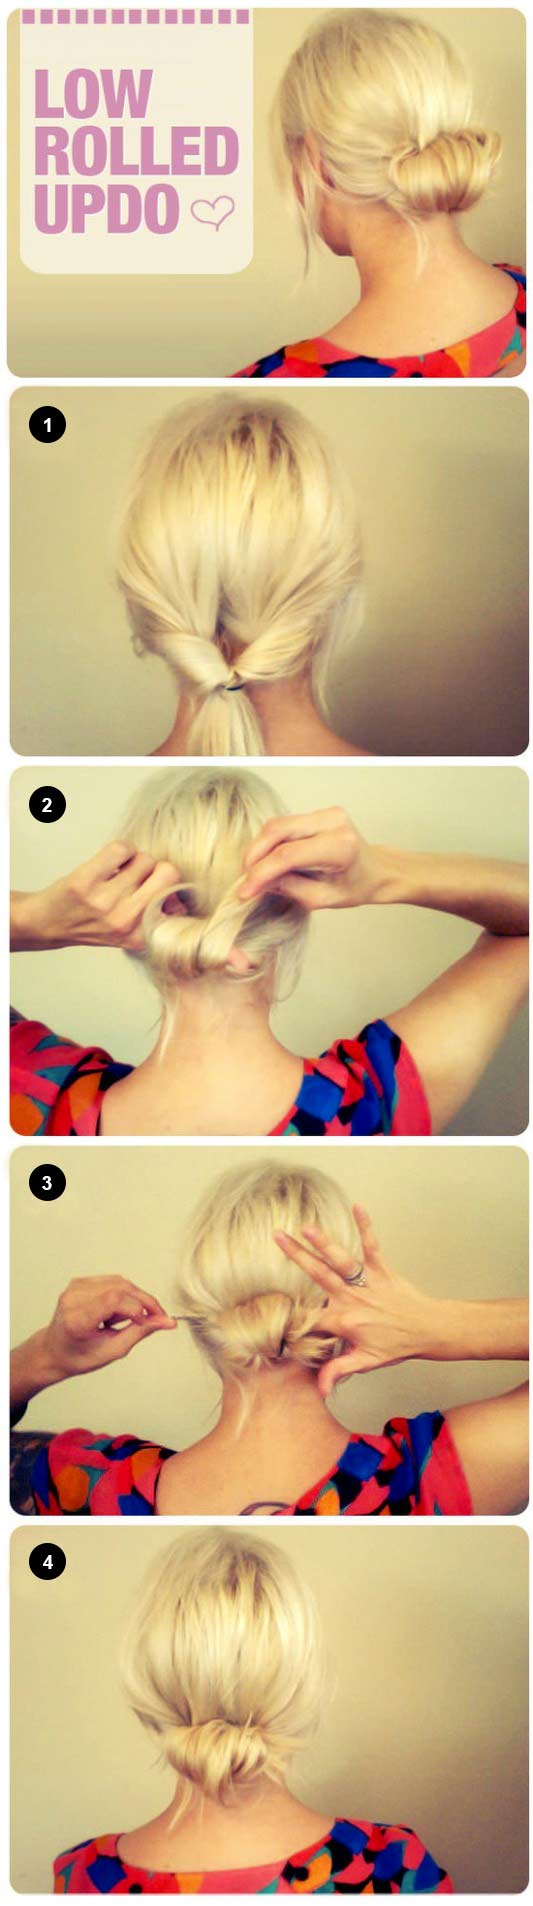
Image Courtesy: letsdohair.tumblr.com
We love this rolled up-do style. It’s really quick to achieve if you’re in a hurry on your way to work but the result is perfect for the office and the perfect balance of smart-casual. Perfect for medium or shorter-length hair, follow these super simple steps to make your own stylish Low Rolled Updo:
- 1/Start with a low pony tail.
- 2/Turn the ponytail “inside out” by picking it up and threading it through itself.
- 3/Roll it up and around your finger.
- 4/Pin it into place and you’re ready to go!
2. The 2 Minute Low Braided Updo for short or medium length hair
A small repertoire of stylish up-do’s is a must for all busy working women and this is one you’re sure to add to your list of favs. We love the versatility of this cute Low Braided Up-do as it’s quick, easy and will add style and sass to every work ensemble. This style is also a great choice for short or medium length hair. Follow the easy steps below to create this yourself.
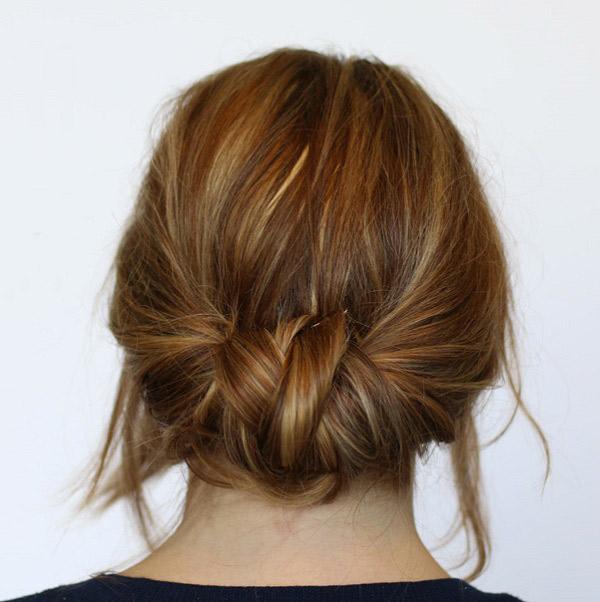
Image Courtesy: diana212m.blogspot.in
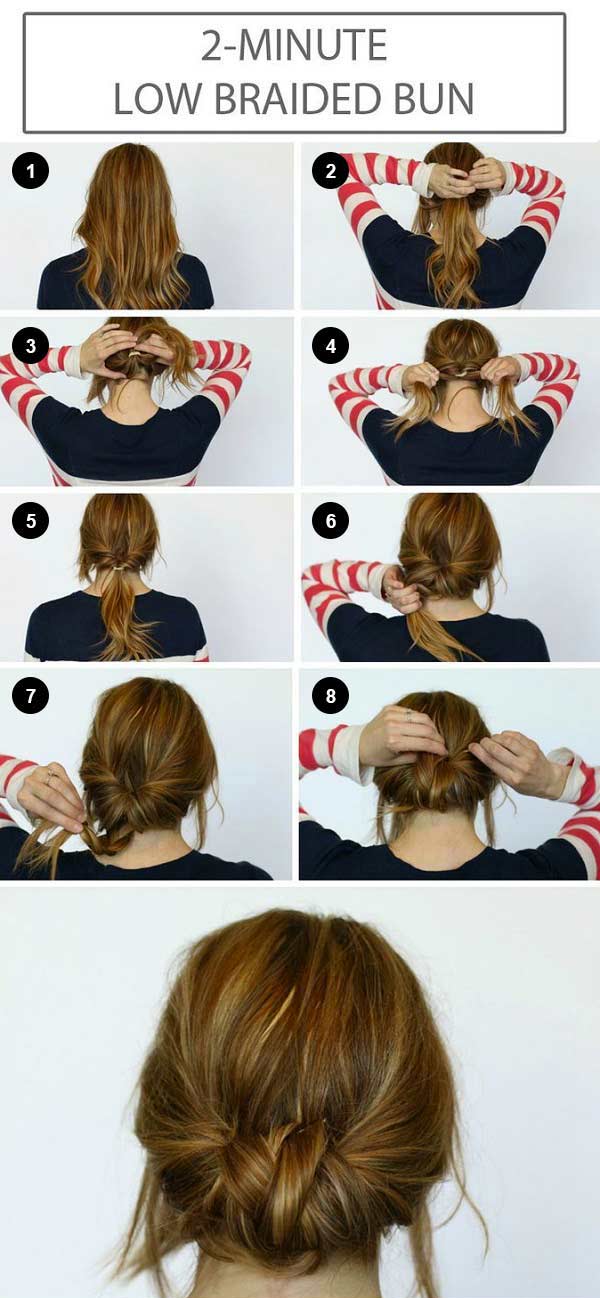
Image Courtesy: diana212m.blogspot.in
- 1/Start with brushed and untangled hair.
- 2/Bring your hair into a low pony and secure with an elastic band.
- 3/Just as we did in the tutorial above, turn the ponytail “inside out” by picking it up and threading it through itself.
- 4/ & 5/Secure and adjust.
- 6/ & 7/Now we add the extra texture to this style by braiding your ponytail.
- 8/Roll and pin up your braid.
Cute Updos for School
3. The Bow
We love this cute ribbon-and-bow as a quirky style to rock to school during the holiday season. Just like your Xmas gifts, it’s the finishing touch of the ribbon and bow that make it extra special so follow the simple steps below to make yourself the best present! This style is better suited for longer hair to really create the perfect bow.
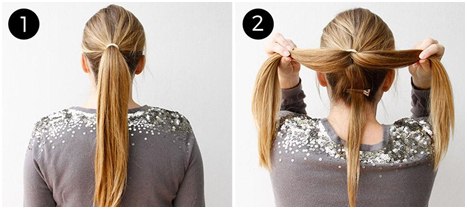
Image Courtesy: more.com
- 1/Start with a simple ponytail that sits in line with the tops of your ears.
- 2/Separate a small section of hair from the bottom of your ponytail (you’ll be using this part later so you might want to clip it down to keep it out of the way). Next, split the remainder of your ponytail into two equal parts as you can see in the picture above.
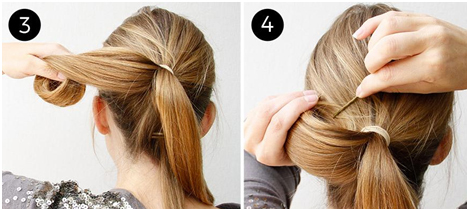
Image Courtesy: more.com
- 3/Take one side of the two equal parts, and roll it in sideways toward the base of your ponytail. Make sure you keep the loop rolling in, toward your face.
- 4/Pin the loop in place and, and ‘spread it out’ a little so now it resembles one half of your bow. Repeat on the other side.
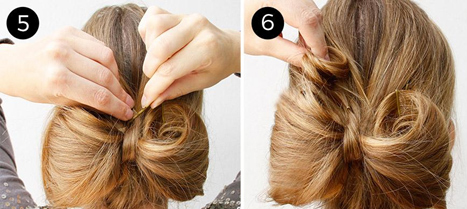
Image Courtesy: more.com
- 5/Now’s the time for the remaining section of hair we pinned aside earlier – this will be the finishing touch. Wrap this piece between the two loops of the bow to create the middle of the bow. Secure it with bobby pins.
- 6/Take a bow cos you’re ready to go!
4. The Late-to-School Loose Bun Updo
Warning: this Loose Bun Updo is going to be one of your new favourite late-to-school styles! It’s super on-trend and also so fast and easy. The best part? If you’ve woken up late and your hair is frizzy or messy, this will do wonders to hide that all away before you step out the door.
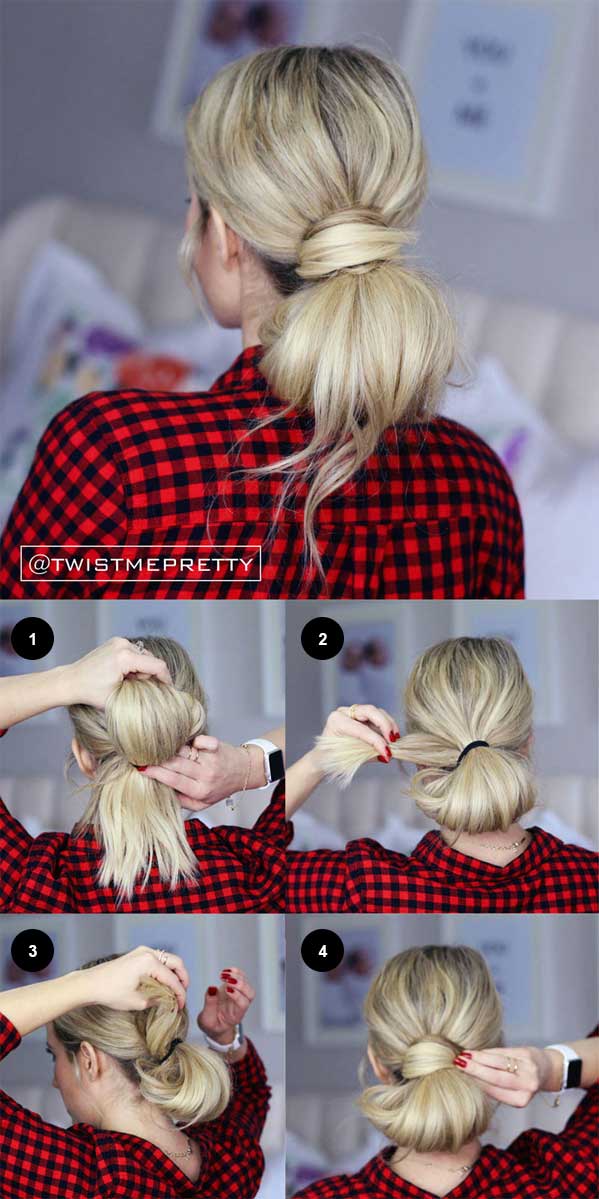
Image Courtesy: twistmepretty.com
- 1/Gather your hair into a half bun by tying a simple ponytail but pulling the last loop only half-way through.
- 2/Pull the tail-ends out and to the side.
- 3/Wrap the tails around the base of your ponytail (concealing the elastic band).
- 4/Finish it off all neat-and-tidy by tucking the tails back through the elastic band on the underside of the bun.
- 5/Voila!
Cute Braided Updos
In warmer weather we can all suffer a little from frizz and unwanted ‘volume’ so why not take this chance to try some messy braided styles starting with our 2 favourite updos below. Perfect for medium or shoulder-length hair this braided ‘do will have you turning heads!
5. The Four-Braid Updo
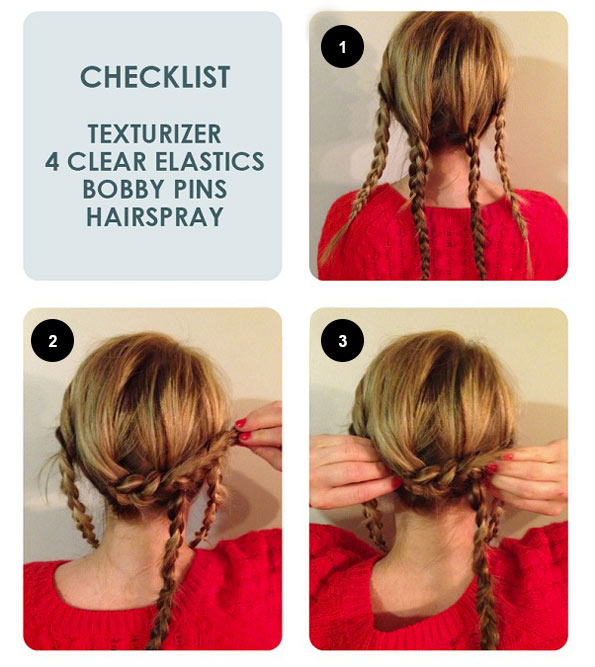
Image Courtesy: loxabeauty.com
Hint: this style works best if you add some texturizing product to your hair before you get going.
- 1/Separate your hair into four equal sections.
- 2/Braid each section right through to the end and tie off each braid with a clear elastic.
- 3/We want to ‘loosen’ the braids a little so work through the length of each by gently pulling and loosening the braiding. Remember: we are aiming for a messier look here.
- 4/Starting with the braid that’s second from the left in one hand, loop it around the braid next to it, to the right.
- 5/Pin it securely against your head using a bobby pin or two.
- 6/Next, take the braid you just looped the previous braid around (second from the right) and wrap back around the loop you just created – in the opposite direction.
- 7/Keep both in place by pinning securely against your head.
- 8/Take the leftmost braid and starting from the left side cross it over the top of the middle braids.
- 9/Repeat step 8 with the remaining braid from the right side.
6. Half-Up Boho Braided Bun
This half-up Boho bun is the perfect style for a summer evening stroll along the beach or even a date night. It’s loose and pretty so it’s perfect for longer hair, but if you’ve got a shorter cut you can always add in a few temporary extensions to really complete this cute look! Check out the simple step-by-step guide below:
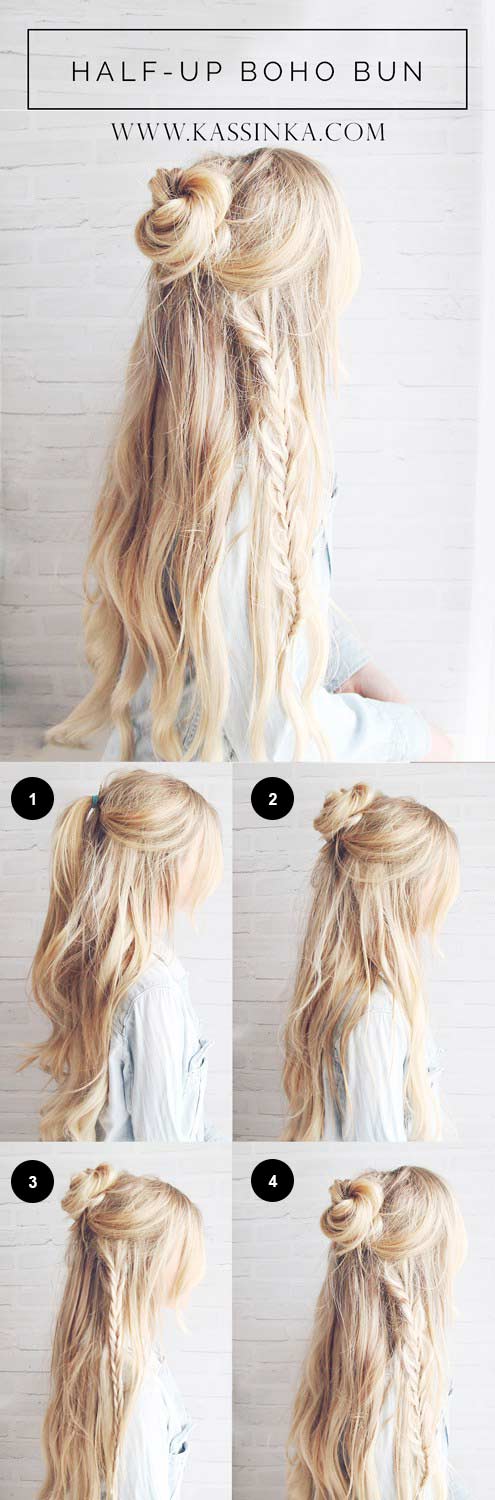
Image Courtesy: kassinka.com
- 1/Begin with your hair in soft and loose waves.
- 2/Pull half of your hair up loosely into a ponytail and secure with an elastic band.
- 3/Twist the hair from the ponytail into a small bun and secure with bobby pins.
- 4/Add 1-2 loose braids to the remainder of your hair falling out beneath the bun to create the boho vibe.
7. Party Perfect Half Updo
If you’re off to dance the night away why not try out this cute half-updo. It’s super simple to create and the result is hot hot hot! The backcombing also gives a great volume boost if you’ve got thinner hair.
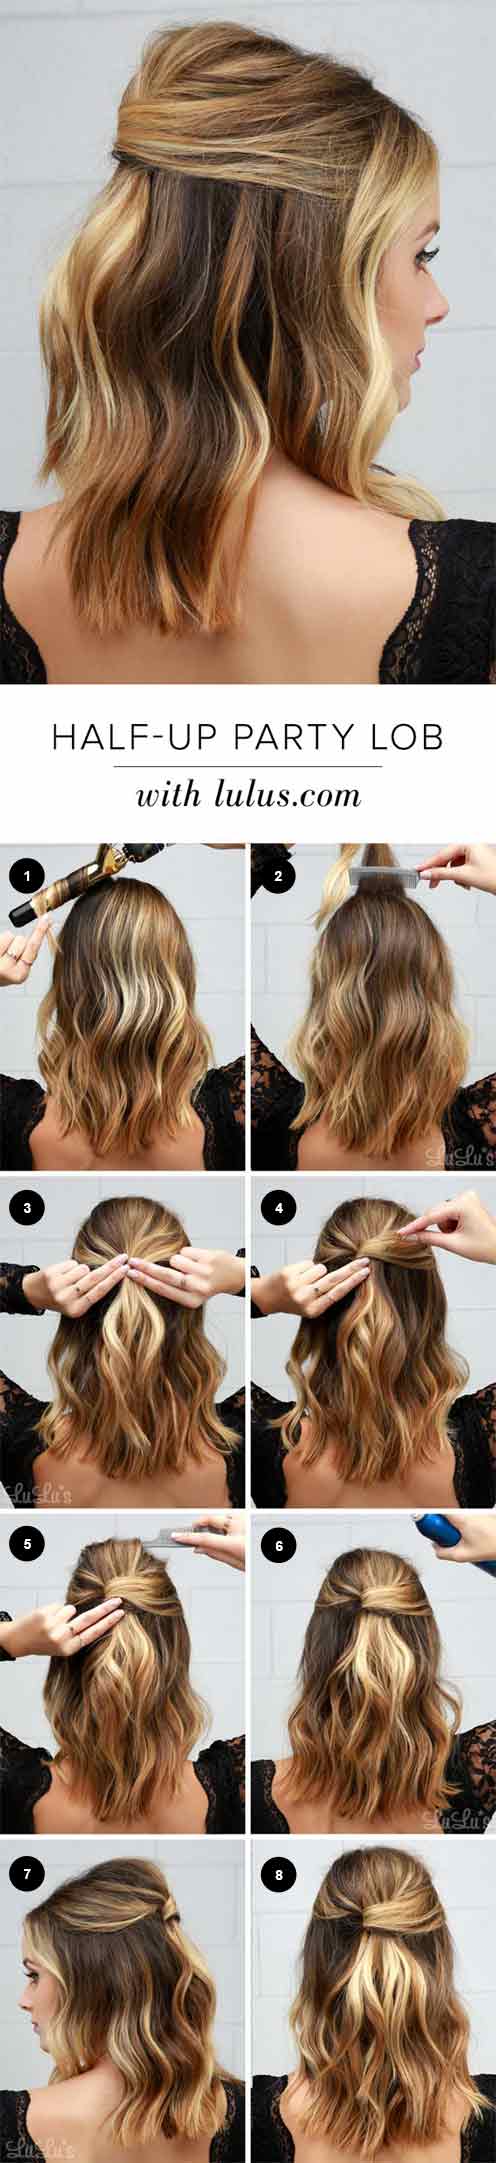
Image Courtesy: blog.lulus.com
- 1/Using a curling iron or straightener create soft waves throughout your hair from the root leaving the ends straight.
- 2/Grab the front-crown section of your hair and backcomb the underside to create volume.
- 3/Run your fingers through the topside of your hair started at the temples to gather the section we will use to create the half updo.
- 4/Pull this section back and create a half twist, pinning underneath to keep it in place.
- 5/While holding the pinned section in place, use the pick side of the comb to lift the crown for volume.
- 6/Complete the style with hairspray! For a more casual look, carefully pull out small pieces to frame your face.
And if you’re looking for more updo inspiration – you’re in luck! Head on over to our dedicated updo gallery.
Related Articles
 15 of the best short hairstyles for women over 60
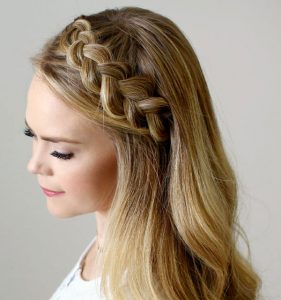 7 of The Easiest Braided Hairstyles You Can Try At Home (Step-by-Step Guide)
 Fine hair, don't care! 9 simple tricks to add volume to thin hair
 5 Hairstyles for Short Fine Hair (plus 40 more!)
 2014 Prom Hairstyles For Every Hair Length
 Coif Trend: Spring 2014 Hairstyles
Filter